Get in Touch with GUANGQI


⚡ Quick Specs
| Voltage | 12V DC (typical residential) |
| Beam Angle | 10°–60° (narrow spot to flood) |
| IP Rating | IP65–IP67 (dust-tight, water-resistant) |
| Material | Brass / Aluminum / Composite / Stainless Steel |
| LED Efficacy | ≥100 lm/W |
| Lifespan | 25,000–50,000 hours |
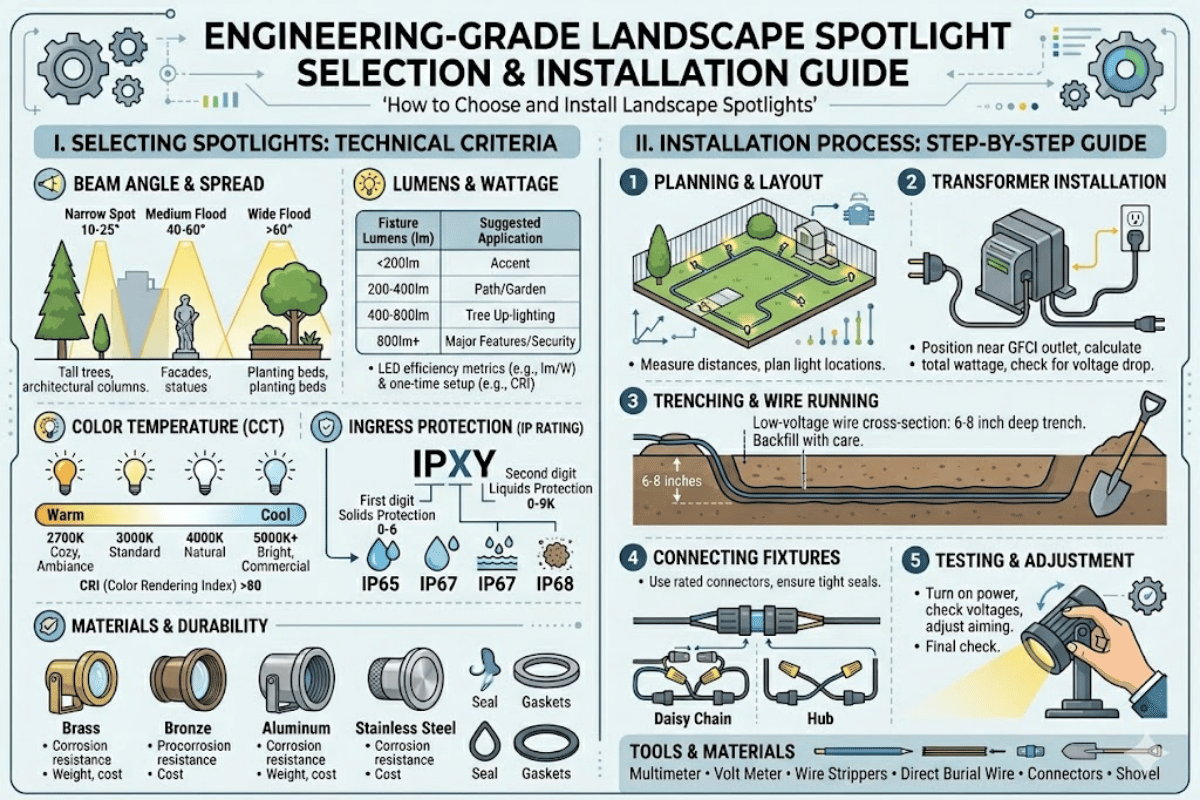
The modern landscape spot light must be carefully chosen for each project. Combining beam angle, voltages, housing materials, IP ratings, and layout strategy decides if your landscape plans last fifteen years or one season. This primer guides you through each engineering level—from LED technology breakdowns to transformer calculations—so you can install landscape spot lights that work. These specs will let you light one specimen tree or entire properties for residential and commercial landscapes.
What Is a Landscape Spot Light and When Do You Need One?
A landscape spot light delivers focused lighting through a narrow beam that enhances specific landscape features—ornamental trees, architectural finishes, sculptures, signage. Flood lights, on the other hand, force broad dispersed illumination that washes spans of land. Most path lights cast diffused downward lights rather than emphasis specific features.
Beam Angle Ta×onomy
Pay attention to beam angle categories when selecting a fi×ture to target each landscape element:
- Narrow Spot (10-15): Pin-point beam for 4-8′ tall trees, flags, narrow columns. 30-50′ throw distance range.
- Spot (20-30): The primary choice for medium sized trees, sculpture, doors. Most landscape spot lights will be in this range.
- Flood (35-60): Lesser emphasis spread for wall washes, trees and broad facades. Collides with dedicated flood zones beyond 45′.
| Parameter | Spotlight | Floodlight | Path Light |
|---|---|---|---|
| Beam Angle | 10°–60° | 60°–120° | 360° diffused |
| Throw Distance | 15–50 ft | 10–25 ft (wide) | 3–6 ft radius |
| Typical Use | Accent: trees, statues, columns | Security, wall wash, driveways | Walkway borders, garden edges |
| Typical Wattage (LED) | 3–15W | 10–30W | 1–5W |
Any when you want to emphasize something—an Japanese maple, stone, architecture—an outdoor spotlight is the best tool. No other lighting utility is designed specifically for that task. Floods and security lighting—designed to discourages intrusions—are not.
LED vs Halogen vs Solar — Which Technology Fits Your Project?
Technology makes choices that all other decisions depend upon. Transforming watts into fi×ture costs, calculating wire size to cost-salvage ratios—the specs MATTER.
LED lights dominate the landscape in large part because contemporary LED chips emit 100-140 lumens/watt lasting upwards of 50,000 hours with potential 20-25 year life times (at 6 hours per night). A switch to LED spotlight modules reduces operating costs by as much as 85% below halogens whiledecreasing maintenance by eliminating bulbs.
Although you may see older installations with halogen chip versions, today’s modern outdoor spotlights feature greatly improved lifetimes (10-25 years at 6 hours per day), reduced electricity costs, and warmer color light output than inductive halogen bulbs. A typical 50W halogen will deliver a similar spread and output as a 7W LED but at fifteen times the cost in operation pricing.
The outdoor garden light only comes in with solar power in a narrow niche. Most solar spot lights pack only 200-400 lumens, 1-3 year battery replacements, and roughly 3 hours of use per night in winter. It is an option for seasonal borders or accents, with permanent wiring already in place, but it does not equivalent traditional focal-point fixtures.
The FEMP suggest that: “only solid-state or LED exterior lighting is considered FEMP-designated” for energy conscious system design (DOE FEMP – Exterior Lighting). From that, we know that energy-efficient bulbs of all styles are the default.
Color Temperature Guide
Color temperature affects both mood and the ability to focus on a task. Warm Amber tones (2700K) emulate the soft incandescent glow. Commercial palette favors 3000K-4000K neutral white for landscape signage and color fidelity of the green plantings. Definitely avoid 5000K+ white for the residential garden setting. It reads as stark and institutional.
| Metric | LED | Halogen | Solar |
|---|---|---|---|
| Lumens/Watt | 100–140 lm/W | 15–20 lm/W | 50–80 lm/W |
| Lifespan | 25,000–50,000 hrs | 2,000–4,000 hrs | 1–3 yr (battery) |
| 5-Year Cost (per fixture) | $35–55 (fixture + electricity) | $95–140 (bulbs + electricity) | $25–50 (battery replacements) |
| Color Temperature | 2700K–5000K selectable | 2800K–3200K fixed | 4000K–6000K (varies) |
✔ LED Advantages
- 75–85% energy reduction vs halogen
- 25,000–50,000 hour rated life
- No bulb replacements — integrated LED module
- Available in 2700K–5000K color temperature range
- Instant on, no warm-up period
- Low heat output reduces fire risk in mulch beds
⚠ LED Limitations
- Higher upfront cost ($15–25 per fixture vs $5 halogen)
- Driver failure can require full fixture replacement
- Color temperature varies between manufacturers
- Dimming requires compatible LED-rated transformers
- Blue-spectrum shift possible in cheap diodes over time
For new landscape lighting projects, the led spotlight is the clear choice for color quality, longevity, and long-term energy savings. Payback on LED versus halogen is 12-18 months in most residential landscape garden lighting projects.
Voltage Systems Explained — Low Voltage (12V) vs Line Voltage (120V)
The vast majority of residential landscape spotlights run on 12VDC power (single wire runs), rather than a high voltage (110-220V) line (hence, low voltage outdoor light fixtures). Installation is less expensive than standard outdoor fixtures; power amps are 90% less costly; installer is less likely to suffer electrical shock with low voltage wiring. And, LED lighting can be buried directly in most jurisdictions without conduit.
12V Low Voltage Systems
The simplest low voltage spotlights start with a magnetic transformer (EMC type) or electronic outdoor transformer (GFCI type) on outdoors GFCI circuit. Your transformer alters household shore power from 120V to 12V AC/DC current using a mounted regulation plate. Low-voltage systems are very safe – NEC Article 411 describes low voltage lighting up to 30 volts requiring only 6-inch minimum burial and no conduit (NEC code reference — low voltage lighting rules). One technical challenge is proper voltage regulation from transformer to socket.
The challenge with pure electrical is what is called voltage drop. As current travels through copper wiring, resistance drops the voltage level. How far away is the last fixture? Try for less than 5% (if you can in residential, under 3%). At the last lamp socket, there should be at least 10.5 V to prevent LED driver failure.
120V Line Voltage Systems
Line voltage outdoor fixtures require conduit, much deeper burial (by NEC, 24″ under pavement, 18″ general), and a licensed electrician to install them. It is more appropriate for security lighting in commercial parking lots than residential gardens.
Transformer Sizing
Transformers should not be loaded over 80% of their stated capacity. So, if your fixture wattage bills in a total sum of 200W, you purchase a 250W transformer (200 1.25). The extra saving in your wallet prevents you from overheating the transformer and helps handle the inrush current associated with transformer startup.
📐 Engineering Note — Wire Gauge by Run Length
For 12V power, the wiring gauge sets the maximum run length:
| Wire Gauge | Max Run Length | Typical Use |
|---|---|---|
| 12 AWG | 200 ft | Main trunk lines, long runs |
| 14 AWG | 150 ft | Medium runs, most residential |
| 16 AWG | 100 ft | Short spur lines only |
For transformer size in Watts, the formula is: Total fixture wattage x1.25. Use a multimeter to check voltage in each fixture after installation.
Over 90% of residential landscape lighting equipment can use low voltage: it is easier to get permitted, DIY friendly, and fixtures are where you want them. Specific lamps are designed to be powered by low-voltage transformer systems.
Material and IP Rating — Brass, Aluminum, Composite, and Stainless Steel
Material quality of the housing determines longevity of your fixture. That twenty dollar aluminum spot is surprisingly resilient in the underworld milieu after a few Washington winters.
Brass (casting, solid, or stamped): One of your best options for superb longevity and beauty. Data from the Copper Development Association reports that brass receives a protective surface patina age that limits corrosion factors. 10-15+ years on ordinary residential landscapes, in climates including salt spray in excess of 5 miles from the salt water. Pay a premium on upfront costs, and overlook replacement costs forever.
Aluminum (casting): Less costly; lightweight. Susceptible to oxidation and often left uncoated for lack of other options. Powder coating wears in 2-5 years depending on how well coated the surface. Avoid aluminum fixtures within 25 miles of coast. Salt air results in pitting of the aluminum within 12-18 months.
Stainless Steel (316 marine grade): A beach-friendly version of brass. Grade 316 stainless is resistant to chloride corrosion, making it appropriate for use near the water and at pool decks. Grade 304 is not good enough for saltwater use.
Composite/Plastic: Cost-conscious choice for temporary or seasonal lighting applications only. Begins to degrade from UV exposure, becoming brittle after 1-3 years. Not suitable for permanent landscape installations.
IP Ratings Explained (per IEC 60529)
The IP (Ingress Protection) rating specifies exactly what conditions a fixture can withstand. Per IEC 60529 standards:
| Material | Recommended IP | Corrosion Resistance | Price Range |
|---|---|---|---|
| Solid Brass | IP65–IP67 | 10–15+ years (patina-protected) | $45–85 per fixture |
| Die-Cast Aluminum | IP65 | 2–5 years (with powder coat) | $15–35 per fixture |
| 316 Stainless Steel | IP66–IP67 | 8–12 years (marine grade) | $55–100 per fixture |
| Composite/Plastic | IP65 | 1–3 years (UV degrades) | $8–20 per fixture |
⚠️ Common Mistake
Cost-cutting by purchasing cheaply-made composite or aluminum light fixtures for waterproof outdoor use is the number one cause of short-lived landscape lighting. Salt air corrodes unprotected aluminum within a year. If you have a property within 25 miles of the ocean, specify brass or 316 stainless with no exceptions.
Placement Techniques — Trees, Facades, Garden Sculptures, and Pathways
Even a professional-quality landscape spotlight will fall short when poorly placed. Beam angle, fixture placement, and aim make the difference between professional-looking lighting and amateur hack work.
Uplighting Trees and Vertical Features
Position uplights 1-3′ away from base or feature, angled 30-45 upward. Use a narrow 15-25 beam angle for tall conifers and columnar trees to prevent spill onto ground below. Use a medium 30-45 angle for deciduous trees with wide canopy, to highlight branches at a distance. Fixture spacing for tree lines: 8-10′ provides uniform light without hotspots.
Moonlighting (Downlighting from Canopy)
Position fixtures 20-25′ high in trees, aimed down through the canopy for moonlight effect. Use a broad 45-60 flood lens and warm white 2700K color temperature. Ironsmith Lighting’s tree-mounting guide covers hardware selection for this technique.
Cross-Lighting and Silhouetting
Cross-lighting involves placing two spotlights on opposite sides of a feature to remove flat shadowing and emphasize 3-D form. Silhouetting involves placing a fixture behind a feature and aimed at a wall so that its form appears as a dark shape to a light background. Both lighting effects can be achieved with directional landscape spotlights with a 20-35 beam range.
Facade Lighting
For wall wash applications, the angle/height ratio determines fixture placement. Place the fixture at a distance equal to half wall height for evenly washed surfaces. For a 16′ wall, this is roughly 8′ away and aimed upward at 60 .
💡 Pro Tip
Before making permanent fixtures, experiment with temporary placement of your spotlights on stakes. Take a walk around the property at dusk and ensure your fixtures light up appropriately without glare for every approach (driveways, sidewalks, neighbor’s yards). A single hour long test run can prevent hours of rework later.
✔ Placement Checklist
- Uplights positioned 1–3 ft from base of subject
- Target size in relation to beam angle (narrow for tall feature, broad for broad feature)
- No fixture aimed toward windows, seating areas, or walkways
- Glare shield installed on each fixture at eye height
- Adjacent properties checked for light trespass
- Even spacing (8–10 ft) along tree lines and borders
- Moonlighting fixtures hung at 20-25′ with stainless hardware
- Nighttime walk-through test completed before burying wire
Wiring, Installation, and Transformer Sizing for DIY Projects
Low voltage spot lighting is one of the least daunting of do-it-yourself exterior lighting projects. The 12V operating voltage means no major risk of shock, and most local authorities do not require permits for LV landscape lighting work. Here are the main steps.
12V Installation Steps
- Plan the layout. Mark the fixture locations with a stake. Draw the route of the wiring from the transformer to the groups of fixtures.
- Calculate the size of the transformer. Total the wattage of the fixtures and multiply by 1.25. eight 7W LED spotlights add up to 56W, so the transformer should be at least 70W (56 1.25 = 70W).
- Determine the wire gauge. For runs over 150 feet, use 12 AWG. For medium ranges, use 14 AWG. No wiring should run more than 100 feet with 16 AWG!
- Mount the transformer. Suspend it at least 12 inches above the ground on a wall or post, situated near a weatherproof GFCI outlet. 210.8(A)(3) NEC mandates using these outdoors.
- Trench the wire. Excavate a 6-inch trench (per NEC 300.5 minimum). Under high-traffic outdoor areas, increase to 12-18 inches and consider conduit protection.
- Choose a wiring topology. Hub (home-run) wiring: run individual cables from each fixture to the transformer. Daisy-chain wiring: run a single spur line from the transformer to each fixture, with reduced voltage at each step. T-topology: add a spur from a central trunk to fixtures in two directions.
- Make connections. Use gel-filled waterproof wire nuts. Strip 3/4 inches of insulation, twist wires clockwise, seat the wire nut securely.
- Test the circuit before backfilling. Turn on power. Use a multimeter to check voltage at the beginning and the end of each cable run; the last fixture should be no less than 10.5V. Use adjustable transformer taps if possible.
- Backfill and conceal. Rebury the trench, restore landscape features, position fixtures securely.
📐 Engineering Note — Hub vs Daisy Chain
In daisy-wire configurations, the last fixture has most loss and will receive less voltage since each light imposes resistance to the circuit. If a run exceeds 4 fixtures, switch to home-run wiring: run a thick trunk cable from the transformer to a central point, then branch out small, 14-G wire spurs to each fixture. This achieves less than 3% voltage loss on a 1,600W lighting system.
⚠️ Common Mistake
Pierce-point connectors (stapling the wire) top the list of irrigation and lighting connectivity failures: they introduce entry points for water, prematurely corrode, and rarely troubleshoot once buried. Always make joints with water-blocking gel-filled wire nuts: the silicone gel repels water and takes up leftover space inside the connector, ensuring a good contact for years to come. Landscape contractors frequently call pierce-point connectors the “root of all evil” in outdoor lighting reliability.
To facilitate exploring a selection of fixtures to match 12V systems, view Guangqi Lighting’s LED landscape lighting collection: bullet lights, well lights, adjustable-angle spotlighting.
Maintenance, Troubleshooting, and Long-Term Performance
Use these techniques to keep your landscape spotlights easy-to-maintain and reliable.
Seasonal Maintenance Calendar
Spring: Clear bugs and green mulching debris from the optics and fixture bodies. Check wire joints at grade for soil settlement. Reaim fixtures shifted by winter freeze-thaw. Check transformer for leaf and branch intrusion.
Fall: Remove and clean lenses every 3-4 months using a soft rag and soapy water. Replace any cracked lens covers prior to freeze cycles. Trimming vegetation that grew into the beampath during growing season
Troubleshooting Guide
| Symptom | Likely Cause | Fix |
|---|---|---|
| Flickering spotlights | Overloaded transformer or voltage drop on long runs | Check total wattage vs transformer capacity; upgrade wire gauge to 12 AWG |
| Last fixtures dim | Voltage drop exceeds 5% on daisy chain | Switch to hub/parallel wiring; use higher transformer tap (13V or 14V) |
| Intermittent outage on one run | Corroded pierce-point connectors | Replace all connections with gel-filled waterproof wire nuts |
| Rapid LED failure (<2 years) | Exceeding rated voltage at fixture | Check transformer tap selection; verify voltage at fixture does not exceed 12.5V |
LED Driver End-of-Life Signs
1-2 times a year inspect and test voltage at terminal fixtures prior to first freeze when cold weather increases wire resistance slightly. Clean lenses with soft cloth and soapy water. Replace any cracked lens covers prior to freeze cycles.
Over time LED spotlight drivers slowly lose lumens unlike traditional driver failures. Look for; naggingly lower LED lumens over 6-12 months, color shift toward blue or pink and audible humming within driver housing. Once these are exhibiting even if the LEDs are still in good shape it is nearing end of life. Integrated LED fixtures require the whole fixture to be changed in a DIY scenario when this occur and are not serviceable.
Lastly if retrofitting retail halogen spots into LED LEDs retrofits are simple (most halogen sockets are original MR and PAR styles) all you need to know is if the existing transformer will handle the new load needs. Some older transformers are magnetic and need a minimum load for operation that the low draw LEDs do not meet.
Frequently Asked Questions About Landscape Spot Lights
Q: What is the best wattage for outdoor spotlights?
View Answer
Most LED landscape spotlights need just 3-10 W for 200-800 lumens of light output. Tall trees or two-story facades may call for 10-15 W. A 7 W LED matches a 50 W halogen.
Q: What is the difference between low-voltage spotlights and regular spotlights?
View Answer
Low-voltage spotlights run on 12V DC through a step-down transformer, which makes them far safer for buried wiring — NEC Article 411 only requires 6 inches of burial depth. Line-voltage spotlights (120V AC) need conduit, deeper burial at 24 inches under traffic areas, and typically a licensed electrician for installation. Low voltage took over residential landscape lighting because the fixtures are easier to install yourself, carry much lower shock risk, and give you more flexibility in where you place them around the outdoor space.
Q: Where should I place outdoor spotlights for maximum impact?
View Answer
Aim for anchor points — front columns, specimen trees, textured walls. Set uplights 1-3 ft from the base at 30-45 degrees. Keep fixtures away from windows and walkways.
Q: Are LED spotlights worth it?
View Answer
LED landscape spotlights run more upfront ($15-25 per fixture versus $5 for halogen) but typically pay for themselves inside 12-18 months on electricity savings alone. A 7W LED running 5 hours a night costs around $3-5 per year in power, while a comparable 35W halogen runs $15-25 annually. LED fixtures also eliminate the yearly bulb replacement cycle that halogen systems require. The U.S. Department of Energy now considers only LED technology acceptable for energy-efficient exterior lighting under its current FEMP guidance — halogen no longer qualifies for any federal efficiency designation.
Q: How often should I replace outdoor spotlights?
View Answer
Quality LED landscape spotlights last 25,000-50,000 hours — roughly 10-20 years at 6 hours nightly. Replacement is usually triggered by driver failure (gradual dimming or color shift) rather than sudden burnout. Halogen bulbs need swapping every 1-2 years. Solar spotlight batteries degrade after 1-3 years. Browse Guangqi Lighting’s full landscape lighting range for long-life LED options.
Q: Can I use solar-powered outdoor spotlights?
View Answer
While lawn-mounted solar spotlights can make for a decent accent lighting option in an area without a wiring hookup, they do have some serious drawbacks. Many units only produce150-400 lumen, batteries last only roughly 3 hours in winter, and re-charge cells fade after only 1-3 years of use. For a primary landscape lighting application, multiple outdoor LED spotlights draw 3 to 5 times the amount of light and maintain a consistent level throughout the year. Solar is a good supplemental garden border or seasonal exterior lighting option.
Q: Why are my outdoor LED spotlights flickering?
View Answer
The flickering is usually caused by voltage drop – the transformer just can not supply even voltage to all the fixtures. Sometimes, wrong wire gauge (16 AWG for 100+ ft run), excess load (total fixture wattage exceeds 80% of transformer capacity), or bad contacts are the reason. It helps to switch from daisy chain wiring to hub wiring layout or replace pierce point connectors with gel filled waterproof wire nuts.
Look into Guangqi Lighting’s landscape spotlight range – tested to last 50,000 hours, IP65/IP66 rated and made with durable brass spotlights.
About This Guide
This information has been provided by Guangqi Lighting (gqlamp.com), an outdoor lighting manufacturer, with over 10 years’ experience in electrical LED landscape lighting design and manufacturing. Specifications for beam angle, IP rating, and energy calculations have been provided by our engineering team in conjunction with research into 12V systems with brass lamps. Copies of source links for all third-party sources mentioned – DOE designation, NEC code, IEC standards, etc. – are provided.
References & Sources
- U.S. Department of Energy – Buying Energy-Efficient Exterior Lighting (energy.gov)
- NEC Article 411 – Outdoor Lighting Installations Operating at 30 Volts or Less
- NEC 300.5 — Underground Installations Burial Depth Requirements
- IEC 60529 – Degrees of Protection (IP Code)
- Copper Development Association — Brass Corrosion Resistance Data
Related Articles
- Designing a Low Voltage Landscape Lighting System
- Spot Light or Flood Light for Landscape? Which Should You Use?87.
- LED Landscape Lighting Maintenance Guide
- How to Select the best Color Temperature Outdoor Landscape Lighting.