
Get in Touch with GUANGQI


This is a walkthrough of the five techniques that establish depth in a landscape lighting plan, the 3-5-7 rule for focal point composition, an easy six-step workflow from dusk survey to transformer sizing, a fixture planning decision matrix for 8 zones, and the seven planning mistakes that lead to re-do calls—including the voltage drop scenario that puts entire zones to 30-40% brightness within 6 months of install. Whether you’re a homeowner planning a 12-fixture DIY job or a designer configuring a commercial landscape lighting scheme, these planning logics apply at every scale.
Quick Specs: Landscape & Garden Lighting Reference
| Design Framework | 3-layer (Ambient / Accent / Task) + 5 techniques + 3-5-7 focal point rule |
| Typical Project Size | 8–30 fixtures (residential) / 50–300 fixtures (commercial plaza/hospitality) |
| Voltage Systems | 12V low-voltage (most residential) / 24V (long runs) / 120V line-voltage (flood, security) |
| Typical Fixture Lumens | Path 80–180 lm · Spot 200–500 lm · Accent 300–1,200 lm · Flood 800–3,000 lm |
| LED Lifespan (L70) | 25,000–50,000 hours per IESNA TM-21 ≈ 12–27 years at 5 hrs/night |
| Energy vs. Halogen | LED uses at least 75% less energy than incandescent sources and lasts up to 25× longer (DOE, energy.gov) |
What Defines Great Landscape & Garden Lighting: Outdoor Lighting Design Fundamentals
Landscape & garden lighting is a term for outdoor (low-voltage 12V/24V or line-voltage 120V) fixtures installed to provide outdoor illumination for four secondary reasons: safety (path visibility, line-of-sight illumination), security (deterrent of perimeter trespassers), aesthetics (improved architectural and botanical understanding), and livability (expanding available hours in outdoor living areas). A high functioning residential system ranges from 8 to 30 fixtures in a given architectural environment; commercial plazas, resorts, and estates routinely specify 50-300 fixtures across a series of connected zones.
It’s not a silver bullet fixture—what distinguishes a professionally planned landscape lighting system from a compilation of retailer stakes is the 3-layer framework: ambient lighting (general background glow to set scene tone), accent lighting (directional fixtures to contrast up trees, facades, water), and task lighting (functional illumination for pathways, steps, entries). Every successful outdoor lighting design utilizes all three factors simultaneously. A backyard illuminated exclusively with path lights achieves task coverage but looks flat and suburban; add tree uplights for accent and a softer wash across the facade for ambient and the same yard reads as designed.
Property value claims are significant, but often overplayed. Outdoor lighting enhances the overall kerb appeal such that it shows up in listing photos and catches buyers attention while approaching at dusk, a positive in markets with evening showings. But a more quantifiable financial advantage is in livability: outdoor dining, gathering, lounging, and recreation hours increase considerably when a yard is fully lit—and that is the case that carries the most weight in homeowners’ minds.
Lighting systems also compare by material environment. Coastal settings require fixtures rated IP67 or higher in corrosion-resistant fixture shells (316L stainless steel, cast brass) because salt-air accelerates galvanic corrosion on aluminum at a rate which makes outdoor standards fixture life out of contention within 3-5 years. Inland settings offer more material options, but hardscape zones—driveways, patios, inground fixtures— must still meet IP67 minimum due to drainage water pressure.
Five Landscape Lighting Techniques: Uplighting, Downlighting, Path Lighting & More
Landscape lighting professionals speak in terms of five key techniques. Each technique manipulates the angle of incidence (impact of the light on a surface), the distance from light source to surface targeted, or the beam angle to achieve a specific visual message. Knowing the vocabulary allows you to communicate a landscape lighting package accurately rather than through trial and error.
Uplighting, Silhouetting & Shadowing
Uplighting installs long fixtures on the ground or in a low position and aims straight up at wall surfaces, trees, columns, or architectural features. Recommended beam angles for uplighting run 15–25° (narrow spot). Lamp lumen output varies from 300–1,200 depending on the height of the tree (unless it’s a palm, which needs 800 lm: 1,600 lm from multiple fixtures). Distance is a key factor for uplight fixtures: run long wire distances from the transformer (140 ft on 16-g wire at 12V) can cause a 35% voltage drop, decreasing the lamp lumen value from 300 to less than 100.
Silhouetting is a variation: position the fixture so the wall or hedge behind the target (bush, statue, or artful patch of ornamental grass) is lit and the fixture behind it pointing at the target. The target appears against a dark background with high contrast. Visual impact comes from the contrast that varying levels of light and shadow over walls, hedges, or patio seating create. Also consider shadowing, where you aim a wide beam (35–60°) so the target’s shadow projects onto an adjacent wall surface, amplifying architectural detail.
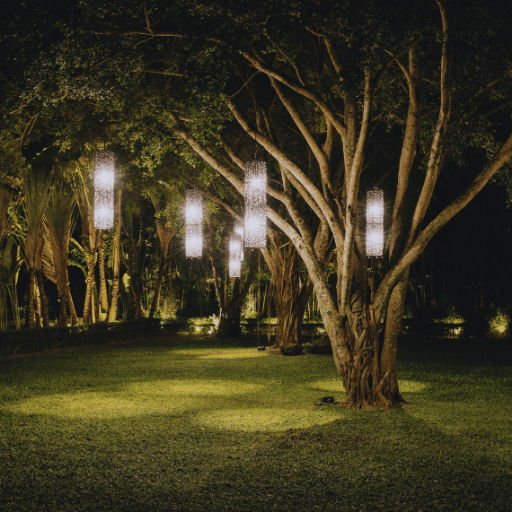
Downlighting & Moonlighting
Downlighting installs fixtures in overhead positions — eaves, pergola beams, or tree branches — aimed downward. Moonlighting is the high-canopy variant: fixtures mounted 20–30 ft up in a tree, aimed down through foliage, produce the dappled shadow pattern of natural moonlight. Beam angle: 25–35° for general downlighting; 45–60° for moonlighting to achieve the spread needed from elevation. The DOE, in partnership with the Illuminating Engineering Society (IES) Outdoor and Nighttime Environments Committee (ONE), created Five Principles for Responsible Outdoor Lighting, eight targeted projects designed to “show how better outdoor lighting practices can be achieved in different environments.” The fifth one recommends TCAM following the five characteristics for targeted downlighting:
“Outdoor lighting should reach only the intended surface — not spill onto adjacent properties, into the sky, or toward wildlife habitat. Light that misses its target is not neutral; it creates glare and waste simultaneously.”
— Adapted from the IES/DOE Five Principles for Responsible Outdoor Lighting (TARGETED principle), co-authored with Rick Utting, Vice Chair, IES ONE Committee; former Director of Lighting, Landscape Forms (2007–2019)
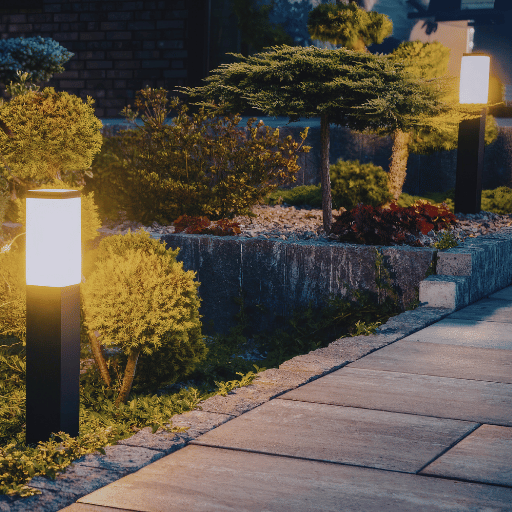
Path Lighting
Path lights serve little tasks as task-layer lighting in gardens: define walkways and illuminate stairs. Path light specifications should specify a 40-60 beam spread, 80-180 lm per fixture, spaced 8-12 ft apart, and installed 14-16 inches above the grade on a stake. Spacing fixtures so glow pools connect seamlessly — rather than abutting each other like runway touchdown lights — is the defining requirement of walkway lighting. Fixtures placed on six-ft intervals with 150-250 lm output will seem blinding even if each location is well spaced and lower output fixtures spaced 10-ft apart will produce a much warmer and inviting environment. Path lights are the most common zone installed by a homeowner and the least technically demanding to get right, since low-voltage wiring runs are shorter.
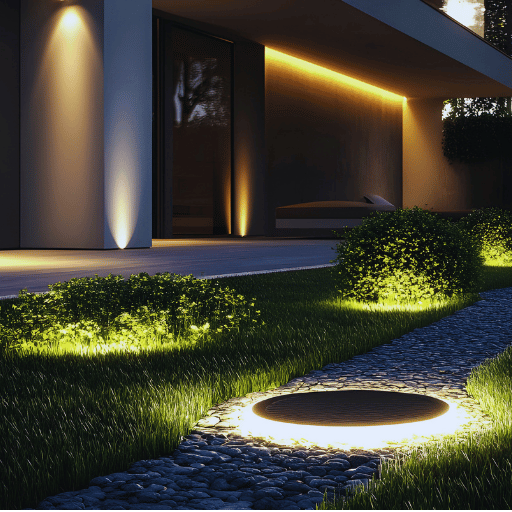
Grazing (Wall & Hardscape Lighting)
Grazing positions a fixture 6–12 inches away from a textured wall surface, oriented nearly parallel to it. Its narrow (10-20, 200-400 lm) high intensity beam skims over stone, brick or wood surfaces, throwing every bump into stark contrast. On smooth surfaces the grazing creates a uniformly bathed wall with accentuated horizontal lines (appropriate for contemporary design); on rough stone or brick it makes texture the message. Fixture placement must keep the source out of primary sightlines — otherwise the bulb itself becomes the dominant focal point. Here’s an illustration of how the faux texture can work to your advantage:
| Technique | Beam Angle | Lumens | Best For | Common Mistake |
|---|---|---|---|---|
| Uplighting | 15–25° | 300–1,200 lm | Trees, columns, facades | Voltage drop on long runs |
| Silhouetting | 35–60° | 100–400 lm | Shrubs, ornamental grass, art | Bright background wall washes out target |
| Downlighting / Moonlighting | 25–60° | 400–1,200 lm | Pergolas, tree canopies | Fixture visible from seating area → glare |
| Path Lighting | 40–60° | 80–180 lm | Walkways, steps, driveway edges | Too close spacing → runway effect |
| Grazing | 10–20° | 200–400 lm | Stone walls, brick facades, hardscape | Fixture visible → lamp draws eye, not wall |
The 3-5-7 Rule: Ambiance, Beam Spread, and Proven Landscape Lighting Design Principles
What Is the 5-7 Lighting Rule?
While the search results for landscape lighting ideas often mention the rule of 5-7 lighting rule, the rule has been more accurately documented as the rule of 3-5-7 (by Britt Hill Interiors, in online design forums, or mostly by its association with the rule of odd numbers) and its original source not in lighting standards documents but within the aesthetic design of groups of objects in interior design. As a rule of thumb for designing focal point groups of objects, the rule has the most widespread acceptance. According to the rule, groups of 3, 5 or 7 objects groupings of objects are more pleasing to the eye than groups of 2, 4, 6 or 8. The reason, as an interior designer notes, is that bisections of even numbers are uneasy, since the viewer’s eye is easily drawn to peer between two objects in the group. If the group consist of an odd number of objects, however, no two objects in the middle create a bisection.
For landscape lighting design in outdoor space, the rule of 3-5-7 becomes a simple focal point composition method, one of the landscape lighting ideas that homeowners can use to guide fixture selection when they are too confused by options to proceed with designing their system: base your plan on odd numbers of focal points. Urban yards with minimal planting should target three focal points (front entry feature, two specimen trees). Suburban residences on a quarter-acre lot should target five (entry feature, two specimen trees, water feature or architectural feature on facade, planting beds). Large suburban or full commercial landscape should incorporate seven or more strategies. But the 3-5-7 rule isn’t a plan for how many fixtures to buy; instead it is a technique for identifying the primary features of the landscape to highlight before purchasing any fixtures. Here is an example for quarter-acre suburban yard:
Focal point 1=entry yard with ornamental trees (uplights, 400 lm); focal point 2= every-few meters landscape edging (modest step lights, 250 lm); focal point 3=house facade (grazing up architectural features, 250 lm); focal point 4=large ornamental water feature (IP68, submersible, 600 lm); focal point 5=specimen tree in center yard bed (ha-ha, 20 uplights, 400 lm). Pathway lighting provides the task layer. It isn’t a focal point, so it isn’t included as part of your odd groupings, and they aren’t counted in your focal point groupings.
Layer Before You Spot
The third principle: establish the three light layers (ambient / accent / task) before choosing fixtures. Lighting designers who select fixtures before establishing the 3 layers typically end up with a mismatched lighting system – dazzling wall-washing floods with no pools of intimate ambient light, no lighting for stairs, gaps between the imperious satellite-farmer spotlights – which just feels lacking. Creating these 3 layers takes 5 minutes and determines the outdoor ambiance of the finished space — the quality that makes a yard feel intentional rather than merely illuminated.
Warm Light for Nature, Cool Light for Architecture
Color temperature (CCT) is one of the more common specification pitfalls. Apply 2700K–3000K to plants, wood, and warm-material surfaces; use 3500K–4000K on modern concrete, steel, and light-colored stone. The failure mode for each: 4000K on deciduous tree foliage washes out green saturation, giving leaves a grey-silver appearance. 2700K on a white or pale-grey modern facade creates a yellow-stain effect that photographs poorly in daylight comparison. Matching CCT to surface material type rather than personal preference eliminates both problems.
Hide the Source, Reveal the Light
The most basic amateur mistake in landscape lighting installation is visible lamp housing. Whenever a fixture lamp is directly visible from a primary sightline (the driveway, the central seating area, the alley), the eye is pulled to the light source and not the illuminated target, resulting in unsightly stray light and wattage use. Professional landscape lighting design has the fixture in such a way that the lamp itself is concealed by the target in question (overhead light hidden behind the tree feeding it, well light beneath surface, or above eye line and pointed downward).
DOE TARGETED rule applies here as well: Unless the fixture is feeding its light output to the target surface, it is feeding its output to the eyes of people near the fixture.
How to Plan Your Landscape Lighting Project: Wiring, Transformer Sizing & LED Lighting in 6 Steps
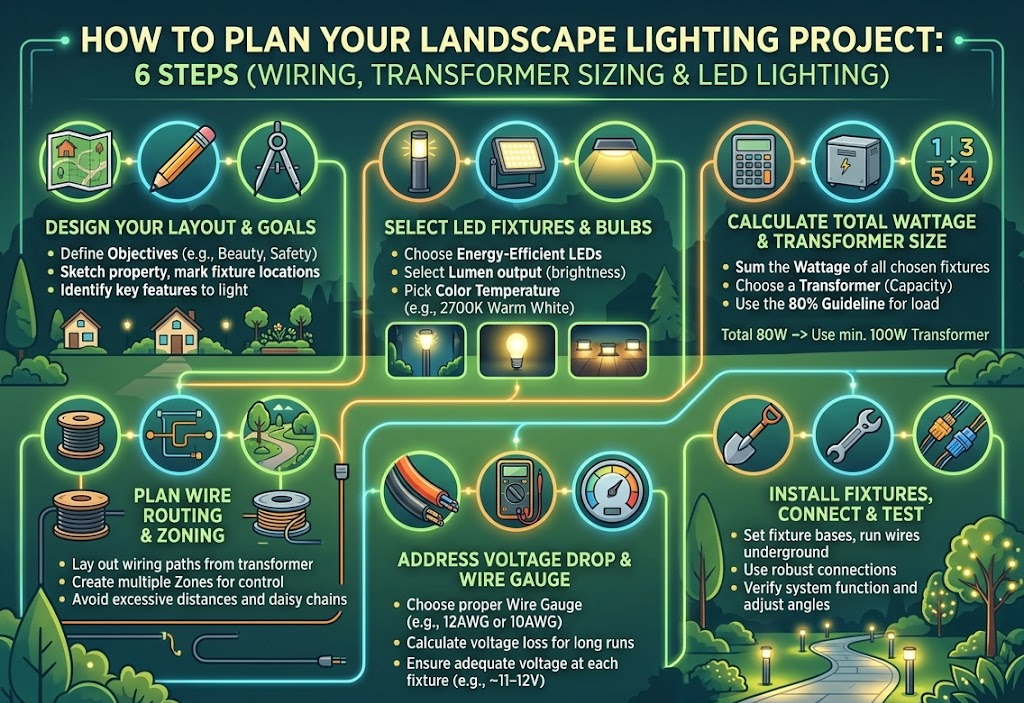
How to Create a Landscape Lighting Plan?
Landscape lighting plan – or an outdoor lighting plan – shows fixture types, locations, wire run paths, transformer placement and load calculations prior to product purchasing. Six steps shown below and can be followed for a residential lighting project; commercial landscape lighting projects require permitting, load calculations (signed and stamped by a licensed electrician), and dark-sky compliance check for some municipalities.
Step 1. Take a dusk and dark shot of your yard. Using your camera, take three shots of your yard: one at civil twilight (the sky is still lit, yard is in shadow), one at the point when it is dark out and your lights are turned on, and finally one when it is dark and your lights are turned off.
This three-shot sequence shows all the ambient light I am working with, from the street and neighboring yards. This is the key info that enables me to avoid over-specification. At this stage, mark your 3/5/7 focal points on a rough sketch similar to the below.
Your focal points identified in darkness may be quite different from what you arrive at at noon.
Step 2. Edges. Create a rough dimensional sketch-it doesn’t have to be perma-architectural of the site that shows: fixture zones(where beds, trees and paths go), wire run pathways from each zone to the transformer location, location of transformer mounting(point near main electrical panel or existing outdoor outlet), location of tree canopies that will provide shade to wire runs.
Indicate existing outdoor outlets, irrigation valve boxes(wire conflicts) and utility lines. Your local 811 service will mark the latter before any digging occurs.
Step 3. Choose Fixture Types by Zone. In the following section, use the Fixture Decision Matrix to choose the appropriate set of fixture types, IP rating, and voltage tier for each of the zones on your site plan.
Choose fixture types before doing a load calculation—the wattage of your fixture type may directly affect transformer sizing.
Step 4. Determine Wattage and Transformer Size. The transformer is the power source for the entire low-voltage lighting system – size it properly or every fixture on the run will be affected.
Total the wattage of each fixture. 1.25 (for safety margin)- never run a transformer over 80% of rated load (thermal stress reduces driver life and can trip thermal cutout). A system of 12 fixtures averaging 7W each, total 84W would require a minimum of105W transformer (84W 1.25)The landscape lighting solution page contains a voltage drop calculator to confirm final load prior to purchase.
Step 5. Design Wiring Topology and wiring runs. There are three wiring topologies the daisy chain series run (single line series from transformer to fixture to fixture), the T-method (alternating central trunk with equal-length branches to fixture groups), and the hub (splicing box at the mid point of the zone).Daisy chain runs are most beginner friendly whereas the used voltage compares to the calculated voltage drop at the far end of longest run.
T-method wiring delivers even voltage to every fixture. Hub method is the professional standard for any run over 75 ft at 12V. See the IP rating and wire material selection guide for conductor gauge recommendations for run length and load.
📐 Engineering Note
Voltage drop: VD=2 L I R where L=one-way run of wire (ft); I=amps (total watts/12v); R=resistance per ft for wire gauge sought (16 ga=0.004/ft; 14 ga=0.0025/ft; 12 ga=0.0016/ft). Assumed desired%=5 (0.6v on 12 v); professional=3 (0.36v). This for example if 10-fixture zone, 7W/fixture=70W; at 12V=5.83A; 14 ga, 80 ft run, VD=2 80 5.83 0.0025=2.33V=19.4% < target=5.
Solution: either form two 5-fixture zones, or run wire using 12 gauge.
💡 Pro Tip
Always install one wire gauge heavier than the value of your VD calculation. After burial the wire cannot be upgraded to a heavier gauge without re-trenching. Wire cost difference is less than $ 8, for 100 ft (14 AWG vs 12 AWG) and re-trenching will cost between $ 200 and $ 600.
Step 6. Install, then tweak at night. Any site plan looks different in the dark.
Almost every professional landscape lighting installer recommends making beam angle tweaks (one-half if not more of the lights have to be adjusted) after the first dusk to dawn walk-through. Budget time for this: And-if you hire a landscape lighting contractor-because it costs money, have it included as part of the contract, not a service call.
Choosing Light Fixtures by Zone: Spotlights, Well Lights & Hardscape Lighting Guide

Fixture selection is ideal if it is ‘by zone’ and not by feature. This matrix correlates eight most common landscape zones with the outdoor lighting fixtures specified by landscape lighting designers—that is beam angle, lumen range, IP minimum and voltage tier, for each zone of application. Use it as the initial guide for Step 3 of the planning process.
| Zone / Feature | Fixture Type | Beam Angle | Lumens | IP Min | Voltage |
|---|---|---|---|---|---|
| Entry walkway | Path light | 40–60° | 80–180 lm | IP65 | 12V |
| Tree uplight (12–25 ft) | Spotlight (cast brass) | 15–25° | 300–800 lm | IP65 | 12V / 24V |
| Tree uplight (25–50 ft palm) | Palm tree ring (multi-head) | 15–35° | 800–1,600 lm total | IP65/66 | 12V / 24V |
| Facade wash (0–15 ft) | Wall wash / spotlight | 25–35° | 400–800 lm | IP65/66 | 12V / 24V |
| Hardscape grazing (stone/brick) | Linear or narrow spot | 10–20° | 200–400 lm | IP65 | 12V |
| Driveway / paver inground | LED inground / well light | 30–45° | 300–600 lm | IP67 | 12V / 24V |
| Pool / fountain submerged | IP68 inground light | 30–60° | 500–1,000 lm | IP68 | 12V |
| Security / perimeter flood | Flood light | 60–120° | 800–3,000 lm | IP65 | 120V |
IP ratings are per IEC 60529. Lumen ranges are auto industry practice estimates. Actual lumens depend on fixture model.
Beam angles are typical for overall fixture group.
✔ Integrated LED (Fixed Module)
- Predictable thermal management — no bulb socket heat point
- 25,000–50,000 hr L70 lifespan (IESNA TM-21)
- Factory-optimized LED module + driver pairing
- Diode not field replaceable. Total fixture replacement at end of life.
⚠ Lamp-Ready (MR16 / GU5.3 Socket)
- Field-replaceable LED bulb — no full fixture change needed
- Post-install beam angle tuning via LED bulb swap
- Wider compatibility — replaces halogen bulbs; accepts any standard MR16 LED bulb. When choosing bulbs for landscape lighting in MR16 sockets, match 12V rating and CCT to the zone specification.
- ⚠ Output consistency depends on third-party LED bulb quality
Choosing Materials for Longevity: Cast brass and 316L stainless steel specification is correct for coastal, permanent applications (15+year expected life). Cast aluminum is suitable for non-coastal, residential (5-10 year turnover budget). Do not specify painted steel for any outdoor application – the galvanic corrosion cycle under paint layer is irreversible within 2-3 years in humid climates.
For detailed IP rating and material guidance, the IP rating and material selection guide covers fixture-to-environment matching by zone type.
For commercial landscape lighting projects needing IP66 or IP67 fixtures schedules and CE/RoHS certified catalog, a factory-direct landscape lighting catalog from Guangqi Lighting features spec-ready SKUs with complete IP ratings, lumen data and CCT choices throughout each product category.
7 Common Landscape Lighting Mistakes to Avoid
What Are the Most Common Outdoor Lighting Mistakes?
From comments by lighting pros and DIY groups, there are seven types of mistake that contribute almost completely to re-due calls for landscape lighting (mislays). If you know what they are in advance, you got your “night adjustment” step taken care of already—know what to design around before the wire is on the ground.
Mistake 1 too-bright lighting that eliminates contrast Too much attention is paid to the number of fixtures actually installed rather than the brightness of each fixture expressed as a lumen count. Precision professional landscape lighting design requires an adequate lux contrast ratio of 10:1 – 30:1 in the daylight differences between a focal point and its field of view background. Increasing the numbers of fixtures at approximately the same lumen output forces a contrast ratio down toward 2:1 or 3:1, and the yard becomes flat as a pancake – all surfaces are at roughly the same level of brightness, removing the hierarchy of focus seen in high-end professional work.
It is not a matter of turning down the lights, but rather of removing fixtures from intermediate- and background areas until the foreground focal points can again be identified as dominant. Field test: if you can make out the individual blades of grass of the accent trees, you are running 40-60% too many path lights.
Mistake 2: “Pre-emptively buying all fixtures before a site plan has been drawn up” Industry practitioners consistently report most service calls originate from unlampted installs – fixture count errors (too many bought, wrong zones covered) and transformer undersizing identified too late. The six-step planning process in this guide takes 2-4 hrs for a house, preventing both.
Mistake 3: insufficient wire gauge for the run length. Quite possibly the number one cause of “half my lights are dim” posts to DIY landscape lighting forums. The simplest way to prevent voltage drop is to plan ahead: compute the projected VD for each run before installing the wire by using the formula in H2 #4, which takes two minutes. For example, a 12 V system with a 100 ft run of 16 AWG wire at 5A power load will have a voltage drop of about 40%, which means fixtures specified to operate at 12 V are getting only 7.2 V outputting about 30% of the rated lumens.
⚠️ Real Case: The Cost of Undersized Wire
A residential landscape lighting upgrade (16 fixtures, 16-gauge wire, single daisy chain, 140 ft of run, 120 W transformer) looked fine on installation day, with all fixtures placed within six feet of the transformer and close to the house. By Day 180, the furthest five fixtures had fallen to around 30% of their original brightness and two had stopped triggering the driver. Diagnosis: 35%+ VD at the furthest point of the run. Re-edit involved a second transformer zone and a re-trench of a parallel 12-gauge run for those five fixtures at a total rework cost of $380 in material (labor cost not included). Estimated wire upgrade cost was only $22.
Mistake 4: Improper color temperature selection for the chosen surface material. Tree uplights specified as having 4000K LEDs will give foliage a metallic-silver appearance rather than natural green. Modern white or pale grey facades specified as having 2700K lamps will cast a nauseating yellow cast on photographs. Use the principle from H2 #3: warm (2700K-3000K), neutral-cool (3500K-4000K) to select appropriate CCT as related to surface material.
Mistake 5: One lighting layer. Path lights alone are effective in parking lot mode, but produce a flat, uninteresting, landing strip. With no accent fixtures on trees or architecture or ambient level light source, the designed landscape quickly seems self contained and empty of layers or interest. To set the fixture list, assign at least one upward pointing fixture to each of the three layers before calculating quantity requirements for each zone.
Mistake 6: Lamp glare bleeding into primary sightlines. When the shape of an incandescent or LED lamp is directly visible from the main driveway approach or the center of the main seating area, the delivered visual experience is a lamp shining into the mind instead of a landscape feature being illuminated in a scene. Insert fixtures so the lamp cup is obscured by the target element it illuminates – behind the base of a tree, flush in turf (well light), or high in the sky (placed in an eaves).
Mistake 7: wrong IP rating at water features. IP65 is the minimum for general outdoor exposure, but fixtures near the water features—fountains, waterfalls, pool watercourse channels—will experience constant water spray from sprayed streams, not just rain. IP65 offers no water jet protection in the splash zone (rated for water projection, not spray pressures under splash). Fixtures 2 ft from fountain jets need IP67 minimum; submersed fixtures need IP68. Cladding a fountain face with IP65 fixtures almost always causes fixture failure within 12-18 months. According to IEC 60529, protection from 30-minute submersion at 1 meter depth is IP67; protection from continuous submersion at fixture manufacturer’s rated depth is IP68.
DIY vs Professional Landscape Lighting Installation: When Each Makes Sense
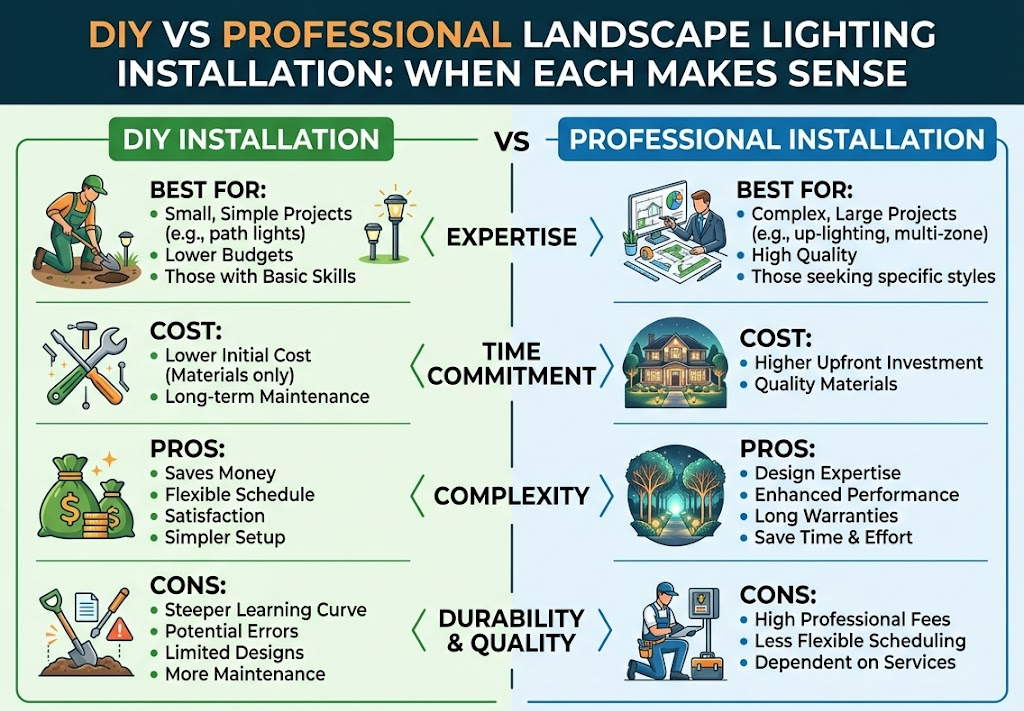
In the design vs install decision, the determining factor should be project complexity, not project ambition. A homeowner familiar with electrical work can draw and install a 12-fixture, 12V low-voltage landscape lighting system in a weekend, but they should not do so for a 40-fixture mixed-voltage installation with 120V security flood lights and buried conduit. That project is best left to a licensed electrician, who is familiar with jurisdictional code compliance.
DIY is best when: the system is light-rail of 15 fixtures on 12V low-voltage, the topology is simple (single zone, 75 ft run), an already-in-place basement power outlet exists, and the homeowner is happy to go on a night profile walk-through afterward. A landscape lighting kit — low voltage transformer, 8–10 fixtures, wire, and connectors — runs $350–$600 and covers most entry patio lighting zones. This diy guide covers the planning steps needed to make that kit succeed. A ≤15-fixture low-voltage system is a practical diy project — the voltage presents no shock hazard and connections are plug-and-play. No shock hazards exist with the low voltage system—plug and play fixtures clarify wiring task assumptions.
Professional installation makes sense in this context if: the project is larger than 20 fixtures or includes any 120 V line-voltage components, the property is commercial (where patio, plaza, design, exterior corridor lighting necessitates zone control), there are historic tree providing aerial facilities for uplighting, the property is coatal (designing with such material specifications expertise adds a layer of reassurance and insurance), or features require code compliance. For your MP custom project, pool lighting specifically, that matters – NEC Article 680, requires the GFCI protection and articleus the required burial depth the project demands. For these projects, a seasoned pro brings both the design vocabulary and code knowledge that prevent costly rework. Lighting for patios, plazas, and exterior corridors at commercial scale also requires coordinated zone control that most residential-grade transformers cannot deliver.
| Project Scope | DIY Materials | Professional Install | 10-Year TCO Est. |
|---|---|---|---|
| 10-fixture residential | $350–800 | $2,000–4,000 | DIY: ~$650 / Pro: ~$2,400 |
| 20-fixture luxury residential | $900–1,800 | $4,500–9,000 | DIY: ~$2,100 / Pro: ~$5,400 |
| 50+ fixture commercial | Not advised | $15,000–50,000 | $18,000–60,000+ |
Cost data includes: HomeAdvisor national average,$4,000; Angi national average, $3,500, professional installation, residential. Cost-of-ownership algorithm assumes LED life extended through the ten year project duration, with one transformer replacement in the DIY scenario.
When evaluating landscape lighting professionals, ask for ILLI certification (International Landscape Lighting Institute). ILLI-certified designers demonstrate competency in design principles, electrical safety, and dark-sky compliance — the industry equivalent of a credential for this unlicensed trade. For commercial projects requiring spec-grade fixtures and factory consultation, request a spec consultation with fixture schedule and IP/CCT confirmation before finalizing the design.
Landscape & Garden Lighting FAQ: Bulbs, Patio Lighting, Wiring & More
How long does LED landscape lighting last?
View Answer
LED landscape lighting testing to L70 as specified in IESNA TM-21 will give 25-50,000 hours of 70% lumen maintenance that is roughly 12-27 years of operation assuming 5 hours a night. Actual LED life varies depending on quality of driver (105C-rated caps will add 33% to LED life in warm enclosures) and how long can the fixture maintain efficient thermal management of LED junction.
How many lumens do I need for outdoor landscape lighting?
View Answer
Compare to lumen needs of Zones in a landscape: Path lights 80-180lm (scatter lights) each; accent lights in trees and architectural details 300-1500lm depending on height at which focused; facade wash fixtures 400-800lm; flood lights 800-3000lm. Use smallest units possible, start within the low end of the scale each fixture has 10-20 times required light output, add fixtures or increase brightness rather than overdriving each fixture which will create glare and not coverage.
What is the best color temperature for outdoor lighting?
View Answer
Use 2700K-3000K on plants, wood, and warm toned materials; 3500K-4000K on modern cement, blank stone, and white toned architecture. Don’t use 4000K on plants otherwise green saturation is washed out and the leaves appear grey; don’t use 2700K on white or light-grey facades otherwise you get a yellow-stain which photographs poorly next to the daylight image.
What is the difference between daisy chain and T-method landscape lighting wiring?
View Answer
Lighting should be wired in a daisy chain sequence, but voltage drop will then accumulate at the last fixture in the run. T-method wiring with a central trunk delivering all fixtures with equal length branches will give more evenly distributed voltage. For any run over 75′ (about 145′ of a traditional ‘U’ shaped run), use T-method wiring or a hub instead of a daisy chain lighting run on a 12V low-voltage system.
How much does landscape lighting installation cost?
View Answer
DIY costs=$350-800/10-fixture system,=$900-1800/20-fixture system; professional landscape lighting is an average of $3,500-4,000 nationally (Homeadvisor/Angi trends), with a common range of $2,000-6,000 depending on fixture grade and whether ground trenching is required, with commercial installation from $15,000 and up, including design, permits, and specialized equipment.
Can I mix different brands of low-voltage landscape lights on the same transformer?
View Answer
Yes, as long as the voltage (12V or 24V) and connection type are the same. Most low-voltage landscape lighting systems are wire brand-agnostic, the transformer energizes all systems regardless of manufacturer, and the fixtures draw current regardless of brand; the transformer must support the total wattage draw, and make sure the total sum is <80% of rated capacity on all zones.
References & Sources
- LED Lighting — Energy Saver — U.S. Department of Energy (energy.gov)
- Five Principles for Responsible Outdoor Lighting — U.S. DOE / Illuminating Engineering Society (IES)
- IESNA TM-21: Projecting Long-Term Lumen Maintenance of LED Light Sources — Illuminating Engineering Society
- International Landscape Lighting Institute (ILLI) — Designer Certification — illi.edu
- IEC 60529: Degrees of Protection Provided by Enclosures (IP Code) — International Electrotechnical Commission
Our Perspective on This Guide
Guangqi Lighting has manufactured IP-rated landscape spotlights and LED inground fixtures since 2010. The voltage drop section in this guide reflects the most common specification error we see in commercial project RFQs — undersized wire gauge relative to run length. The 3-5-7 rule discussion reflects our observation that design frameworks adopted from adjacent disciplines often give outdoor lighting designers a more practical vocabulary than standards documents alone.
Related Articles
- How to Choose and Install Landscape Spot Lights — fixture selection guide for uplighting and accent applications
- LED Inground Light Guide — IP67/IP68 well lights for driveways, pavers, and pool surrounds
- The Complete Guide to Swimming Pool Lights — underwater and pool-perimeter lighting design
- Solar Flood Lights: Specs, Types & Installation — off-grid security and perimeter lighting options
- LED Driver Guide — transformer and driver selection for low-voltage landscape systems
- Commercial Landscape & Garden Lighting — Solution Page — IP-rated fixture catalog, voltage specifications, and factory-direct sourcing